- Home
- Easy Knitting Patterns
- Knitted Bag
Knitted Bag - How To Knit A Handbag
This knitted bag is an easy knit pattern that's great for beginners and all knitters who would like to make one.
There are many ways to knit a bag. This one is basically a long strip of knitting that you'll fold and seam the sides. So it's a fun easy knit.
Since I wanted my bag to hold more things I added gussets but even that is super easy to do.
And when I knit my big ol' knitting bag that was just two big garter stitch squares that I seamed together. Again I added gussets to make it bigger.
There is a link a little further down if you'd like to know what a gusset is.
But when it comes to knitting a bag your options are endless on how to create it.
This is a casual knit bag for those running around days and yet it's big enough to hold everything. I just love mine.

And it's even easy enough to knit while you sit and watch TV or chat with your friends. I like that kind of easy knit pattern don't you?
So let's get started knitting a bag...
Knitted Bag Pattern Details
Skills Required: Cast on, knit, purl, cast off
Materials: 450 yards worsted weight yarn and 1 ball of contrasting yarn
Needles: US 5 (3.75 mm) and US 7 (4.50 mm)
Gauge: 4 sts and 7 rows = 1 inch (But don't stress too much over gauge)
Finished Measurements: Lying flat approximately 16 " X 10"
Abbreviations: RS = right side, WS = wrong side, sts = stitches
Notes: I made a 1 inch hem leaving the ends open so that I could slide the handles through easily.
This hem will be folded over to form a pocket/tube for the handles.
Slip the first stitch of every row as if to knit and knit the last stitch of every row.
If you don't want to knit the handles you could look in your local craft store for some prettier ones.
I tried to find some but unfortunately I couldn't find any so I just knit them instead.
There is a bottom gusset as well as side gussets. What is a gusset? I used them on my big ol knitting bag and explained what they are.
Click on the link to download knitted bag pattern
Knitted Bag Pattern

Starting with hem and size 5 needles cast on 67 sts.
Work in Stockinette stitch for 9 rows ending on a knit row.
Next Row: Switch to size 7 needles and with WS facing: Knit (This marks the fold line for the hem)
stitch pattern used for knitted bag
Row 1: Knit
Row 2: Purl
Row 3 - 7: Knit
Row 8: Purl
Row 9 and 10: Knit
This forms pattern. Work pattern until work measure 10 inches from fold line of hem. (This should be about 24 ridges of Garter stitch not counting the hem line row)
Next Row: Knit
Form Bottom Gusset
Next Row: WS - Knit (This marks the gusset by creating a garter st. ridge)
Work 14 rows of Stockinette st. to form bottom gusset or approximately 2" ending with a knit row.
Next Row: WS - Knit (Marking gusset again)
Continue on with stitch pattern knitting up other side of bag for 10 inches
Next Row: (Beginning of hem line) WS - Knit
Next Row: Switch to size 5 needles and knit Stockinette st. for 8 rows for hem.
Bind of loosely
Side Gussets (Make 2)
Note: When knitting side gussets you'll be matching the width of the sides to the width at the bottom of bag so it's all symmetrical.
So you'll remember that you knit a 2 inch gusset at the bottom of the bag and the sides will also have a 2 inch gusset.
Cast on 8 sts. Work garter stitch for 10 inches (length of side of bag) and cast off loosely.
Finishing
Seam gussets to the bag. Weave in ends. Lightly steam the hem so it lies flat and sew into place leaving ends open for the handles.
I-Cord Bag Handles
I made I-cord handles in each color then seamed them together. I was trying something a little different.
When you're finished just work the i-cord through that pocket hem you made on your bag. Then seam ends of I-cord handle together.
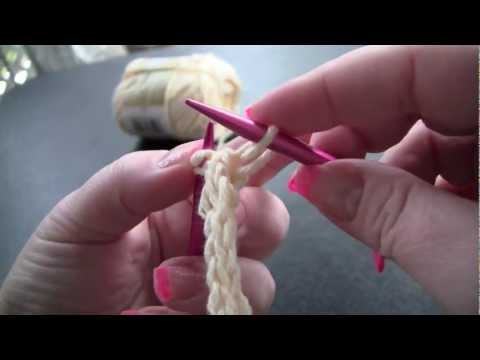
If you're not sure how to make i-cord I'm including a video to help you.
how to knit i-cord on straight knitting needles video
In the video this lovely gal is knitting continental style. Please don't be confused if you use the English knitting method.
It's all knitting and that stays the same. You'll knit a row and then slip the stitches back over to the left needle and so on. It's super easy, have a look.
Want An Alternate Bag Handle That's Even Easier?
Here's another very simple knit handle you can knit and you may like this one better as it will lie flat on your shoulder.
Cast on 8 stitches and knit garter stitch (knit every row) until you reach the length you would like for the handle.
Keep in mind that garter stitch is very stretchy so it will lengthen when you slip it on your shoulder.
The nice thing about this handle is that it will lie flat on your shoulder and won't slip off.
lining your knitted bag
It isn't always necessary to line a bag. It just depends what you will be using it for.
I have to admit that I don't sew very much but I did decide that I would line this particular bag.
You can use a sewing machine to seam the fabric or if you prefer you can also hand sew it.
Video - How To Sew A Lining In Your Knitted Bag
I found a great video that will help show you how to line your bag. Even though this pretty bag is crocheted the lining process is the same.
Hope this helps. Enjoy!
I am a participant in the Amazon Services LLC Associates Program, an affiliate advertising program designed to provide a means for sites to earn fees by advertising and linking to Amazon.com and affiliated sites. If you make a purchase through one of my links I may receive a small commission. This will not affect the purchase price and you will not pay more when you buy through my link.
Copyright © 2011 - 2026 by Vickie Danielsen All Rights Reserved
Please don't copy the content of this site. It is Copyscape protected
