- Home
- Easy Knitting Patterns
- Knit Scarf
Knit Scarf on circular needles
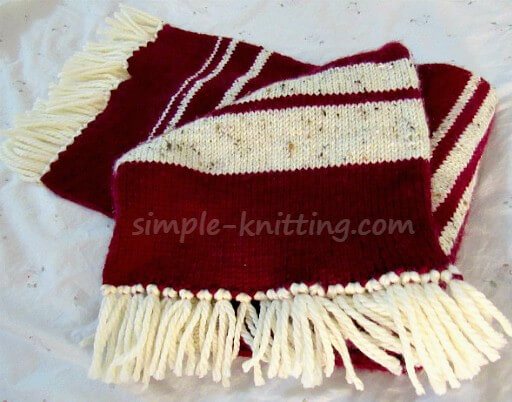
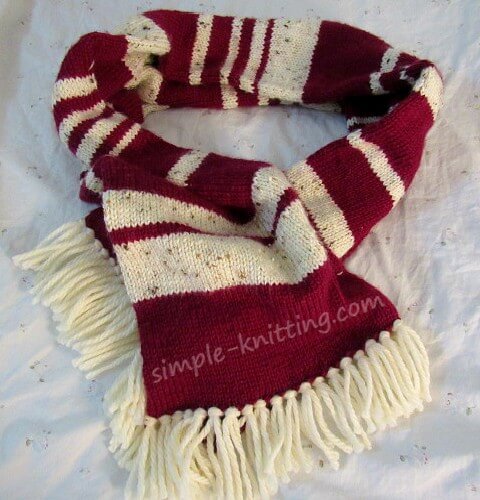
This simple knit scarf pattern is soft and super squishy and it's in plain Stockinette stitch and it isn't curling.
It was really fun to knit because it's a little different. I'm sure many experienced knitters have done this before.
However I want to give beginner knitters another alternative for knitting a scarf in Stockinette stitch that won't curl.
This has to be my favorite scarf. And I was using it a lot through our long cold winter. It's super cozy and warm.
The fun thing about this easy knitting pattern is that it's a knit scarf on circular needles, also called a tube scarf.
And this is a fun and easy scarf pattern to try.
Sometimes I just want a nice, warm plain knit scarf in super soft yarn. And most of all I don't want to worry about it curling up.
This is great if you're new to circular knitting and want to practice and honestly, it's a lot easier than you think, in fact it's so simple and fun to knit.
All you'll be doing is knitting a long tube and then flattening it. Read on and I'll give you all the details.
Types of Yarn To Use For This Knit Scarf
Use any yarn you'd like up to and including a worsted (medium) weight.
When you knit this scarf you'll be flattening it so a bulky yarn may be too heavy and awkward.
Fingering weight (sock yarn), DK weight, Sport weight and Worsted weight yarns will be good choices for this scarf knitting project.
And you might also like to choose a lovely self striping yarn too.
Make sure to read the yarn label for a suggested needle size for that yarn. Click on the link if you'd like to double check what to look for on a yarn label.
If you decide to use up yarns that you have on hand you might have fun using this nifty stripe generator to give you ideas about where to place them.
Choosing Circular Needles For Your Scarf
We're all used to choosing the right width size or diameter for knitting needles right.
For instance we'll probably choose something like a US 8 (5mm) or US 9 (5.5mm) for worsted weight yarn right?
In fact you'll probably need something like a US 5 (3.75 mm) to US 9 (5.5mm) depending on the yarn weight you choose.
That's still important. However since you'll be knitting in the round you'll need to be aware of the length of the circular needle you're using as well.
In order to knit in the round your knitting stitches have to fit right around the length of your circular knitting needle.
I recommend either 12 inches long or 16 inches long. You decide which you would prefer.
What you'll do is cast on enough stitches to go around whichever length you choose.
Here's A Recap Before You Start Knitting
- Choose your favorite knitting yarn, some nice self striping yarn would be fun to use (fingering, DK, sport or worsted weight yarn)
- Check the yarn label for a suggested needle size (for instance worsted weight you'll need size US 7 - US 9)
- Decide which circular knitting needle length you want to use - 12 inches or 16 inches long
- Purchase your fixed circular knitting needles (the package tells you the length as well as the diameter of your needles)
How To Cast On Stitches For Knitting In The Round
I thought I'd show you how to cast on for knitting in the round. You'll need enough stitches to go right around the circular needle.
For instance I used a 16 inch long circular and cast on 100 stitches. This is what it looks like.
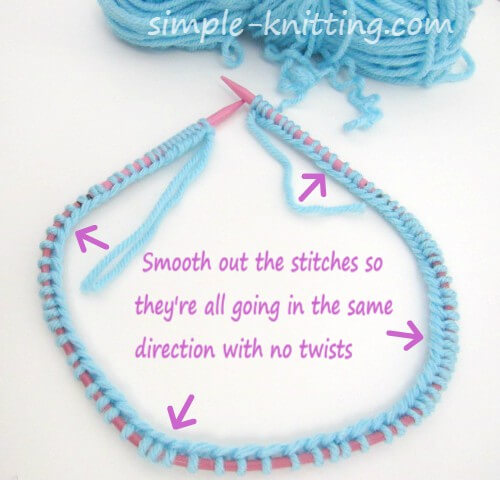
Make sure all the stitches are facing inward with no twists. And make sure you have enough stitches on your needle so you can knit comfortably.
Sometimes it helps to lay everything down on a table so you can adjust the stitches.
Make sure none of your stitches look like the picture below.
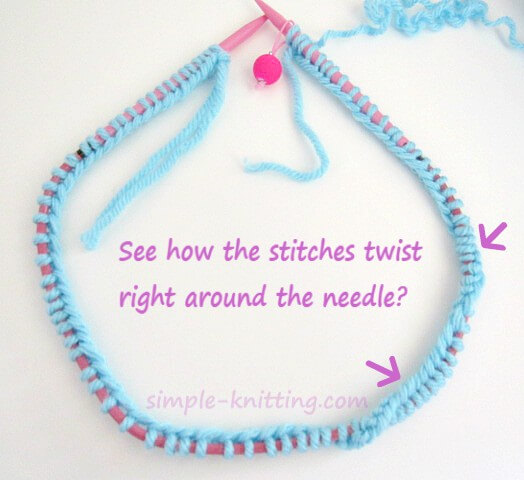
Some of the stitches are twisted in this photo. Make sure to straighten them out so they're all facing one way like the first photo.
If you start knitting with the stitches twisted this way you won't be able to fix it and you'll have to start over.
When you're stitches are all straightened out pop on a marker to mark the beginning of your round and you're all ready to go.
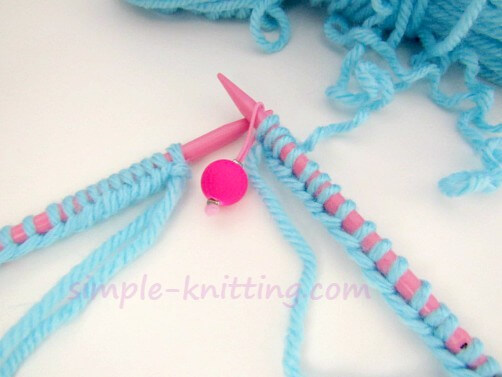
Now you're ready to knit. You'll take the right needle in your right hand and start knitting into the stitches on the left needle. (Just like knitting on straight needles)
That's all it means when you join for knitting in the round. You'll just keep knitting around and around until you reach the length you want for your scarf.
Below you'll find the knitting instructions for my knit scarf. Feel free to experiment though.
Knit Scarf Pattern Details
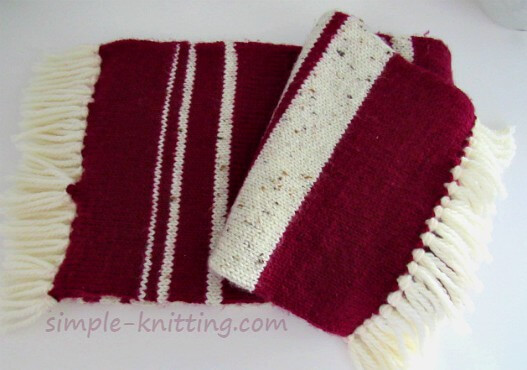
Skills Required: Knitting in the round, joining new yarn, casting on and binding off
Gauge: Not important
Knit Scarf Size: 10 inches wide and 60 inches long
Materials: Yarn: 3 skeins - Cascade Pacific yarn, color beet and 2 skeins Caron Simply Soft, color off white tweeds.
Circular Knitting Needles: US 9 (5.5mm), 16 inches long
Note: You may find a row counter handy for this knitting project. Or a pen and paper to mark your rows.
If you'd like to download my knit scarf pattern click here
Knit Scarf On circular needles Pattern
You'll be using two colors so color A = red and color B = white
With color A cast on 100 stitches. Place marker at beginning of round and follow the stripe sequence below.
Simple Knit Scarf Stripe Sequence
Simply start with color A in first column and work your way down. Then work your way down the second column.
If you'd like to make your scarf longer just start over again at round 1.
So to begin you'll use color A and knit 26 rounds, then you'll simply drop color A and add color B and knit 14 rounds.
So to begin you'll use color A and knit 26 rounds, then you'll add color B and knit 14 rounds, then continue down the column.
Rnd 1 Color A. Knit 26 rounds
Color B. Knit 14 rounds
Color A. Knit 3 rounds
Color B. Knit 8 rounds
Color A. Knit 18 rounds
Color B. Knit 5 rounds
Color A. Knit 17 rounds
Color B. Knit 2 rounds
Color A. Knit 3 rounds
Color B. Knit 4 rounds
Color A. Knit 3 rounds
Color B. Knit 3 rounds
Color A. Knit 4 rounds
Color B. Knit 4 rounds
Color A. Knit 20 rounds
Color B. Knit 13 rounds
Color A. Knit 20 rounds
Color B. Knit 4 rounds
Color A. Knit 7 rounds
Color B. Knit 3 rounds
Color A. Knit 4 rounds
Color B. Knit 4 rounds
Color A. Knit 2 rounds
Color B. Knit 13 rounds
Color A. Knit 23 rounds
Color B. Knit 4 rounds
Color A. Knit 7 rounds
Color B. Knit 2 rounds
Color A. Knit 7 rounds
Color B. Knit 7 rounds
Color A. Knit 17 rounds
Color B. Knit 4 rounds
Color A. Knit 13 rounds
Color B. Knit 7 rounds
Color A. Knit 20 rounds
Color B. Knit 3 rounds
Color A. Knit 8 rounds
Color B Knit 2 rounds
Color A. Knit 3 rounds
Color B. Knit 2 rounds
Rnd 41 Color A. Knit 2 rounds
When you reach the length you want bind off all stitches.
Finish: Turn your scarf inside out and weave in ends.
Once your finished weaving in the ends, you can seam both ends of your scarf. Or if you're going to add fringe to the ends the fringe will close the ends nicely.
I found a great knitting video to show you how to add fringe to your lovely knit scarf
Adding Fringe Knitting Video
Happy Knitting!
