- Home
- Knitting Tips
- Tinking
Tinking - How To Unknit A Row
Tinking stitches is a simple knitting technique to use when you make mistakes in knitting.
And it's a whole lot faster to tink a few stitches then it is to unravel everything.
All you need to do now is learn how to tink knitting and I'm going to help you.
Tink is the word knit spelled backwards and 'unknitting' is another term knitters use.
Let's face it, we all make mistakes in knitting.
The real trick is being able to fix knitting mistakes without unraveling all your knitting.
Tinking is when you undo knitting one stitch at a time to the place where you made the mistake.
Sound difficult? Don't worry, the good thing is unknitting stitches is quite simple to do.
And you do it slowly and methodically so it's not scary or anything, just tedious at times.
Besides, it's not as scary as unraveling all of your knitting and then trying to get the stitches back on your needle.
When Do You Use Tinking?
Unknitting works well when you find a mistake on the row you're knitting or maybe even the previous row.
If you find a mistake much further down in your knitting tinking doesn't work so well.
It is possible though because I've done it but when you undo knitting this way it's very slow and tedious.
And if you have lots of pretty knitting stitches to unknit it could get a little nerve-racking.
Tinking Knitting Overview
In order to know how to tink knitting you need to read your knitting.
It'll make it a lot easier. And I'll help you. Have a look at the picture below.
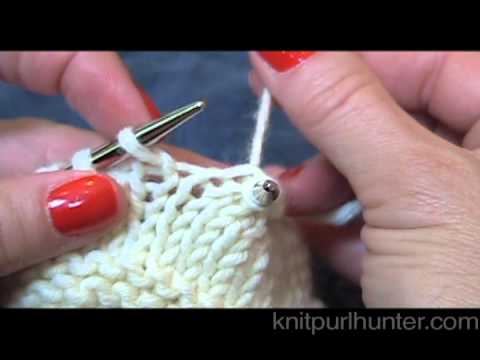
I've turned my right needle around a bit to show you the main parts you'll need to recognize before you start.

I marked the main characters here, the new stitch, the old stitch you just knit off the left needle and the working yarn
When you tink a stitch you'll put the old stitch back onto the left needle and undo (unknit) the new stitch off the right needle and in that order.
Now think about this okay? So that it makes sense in your mind and look at the photo.
When you unknit a stitch you put your left needle into the old stitch as you gently slide the new stitch off the right needle.
Then you give the working yarn a tug to finish unknitting the new stitch.
Have another look below to see how it all ties in.

See how the new and old stitch are all basically connected by the working yarn?
New stitch, old stitch and working yarn. That's it.
Knitting really is just a series of loops. So neat..
Tinking Knitting Instructions Step-by-Step
Yikes! I just noticed that I purled a stitch by mistake.

So I will unknit to the spot where the mistake is, tink it and carry on knitting.
Let's get started tinking.

In the photo above I'm pointing to the stitch just below the stitch on the right needle. This is the old stitch

With your left needle push it through the old stitch that's just under the stitch on the needle.
So keep in mind you want the old stitch back on the left needle.

Now, slip the stitch off the right needle and gently tug on working yarn to release it.

Just keep tugging on working yarn to completely release the stitch from the right needle.

And you're done. The old stitch is now on the left needle and you just unknit a stitch.
So What Happened With The Purl Stitch?

I undo knitting one stitch at a time to the purl bump.
Then I push the left needle through the purl stitch as I slide the stitch above it off right needle
It's the same as the above instructions only it's a purl bump instead of a knit stitch.
When the stitch is back on my left needle I can simply knit it and carry on knitting. It's all done.
Would you like to watch how it's done?
This is an amazing unknitting video showing this technique both for knit stitches and purl stitches.
Everything will make sense after you see the video too.
Tinking Stitches Knitting Video
Happy Knitting!

Like This Page? Please Share it
I am a participant in the Amazon Services LLC Associates Program, an affiliate advertising program designed to provide a means for sites to earn fees by advertising and linking to Amazon.com and affiliated sites. If you make a purchase through one of my links I may receive a small commission. This will not affect the purchase price and you will not pay more when you buy through my link.
Copyright © 2011 - 2026 by Vickie Danielsen All Rights Reserved
Please don't copy the content of this site. It is Copyscape protected
