- Home
- Knitting Instructions
- How to Make 1
How to Make 1, m1, m1R, m1L increase in knitting
Today I'm going to show you how to make 1, m1, m1r and m1l. And they all mean the same thing, increasing a stitch in knitting
After all it's nice to know a couple of ways to increase stitches in knitting and the make 1 is a really good alternative increase for some knitting projects.
We all know the knit front back (KFB) increase and it's a simple and effective increase but it's really nice to know another one as well.
Plus the fact is the KFB increase does leave a little bar and a little bump in your knitting whereas the M1 lies flat and is practically invisible.
For instance, if you're knitting a sweater in Stockinette stitch you will probably want to use the make one knitting increase instead of the KFB.
Sometimes a certain stitch increase will work better than another one plus it's nice to learn a few alternative increases for the projects you're going to be knitting.
And since the make one knitting increase is practically invisible you'll want to use this one a lot. I sure do.
Here are three questions I get asked a lot. Hope they help you too.
How Do You m1 Stitch?
The make 1 knitting increase is made by using the running thread that's in between the stitch on your right needle and the stitch on your left needle.
And the way you actually make the new stitch will determine whether it slants to the left for a m1l or whether it slants to the right for a m1r.
My knitting step-by-step pictures below will show you exactly how to make 1 both ways.
My Pattern Just Says To M1, What Do I Do?
When your pattern says to M1 and isn't more specific by using the Left - L or the Right - R, it usually means that you can use either.
The M1L means it's a left-leaning increase and the M1R or m1r means it's a right-leaning increase.
Doesn't A M1 In Knitting Make A Hole?
No it doesn't. You see when you m1 stitch in knitting you will twist the stitch as you're making it which closes up any hole that might be there.
I think one of the tricks is not holding your yarn too tight when you make it.
Ready to get started? Great and there's a make one (m1) Knitting Video when you're finished with the step-by-step picture instructions.
How to Make 1 Left (M1L) and M1 Knitting Instructions
So here's how to m1 in knitting without a hole
Just a quick note that the pictures are on the top with instructions below each photo.

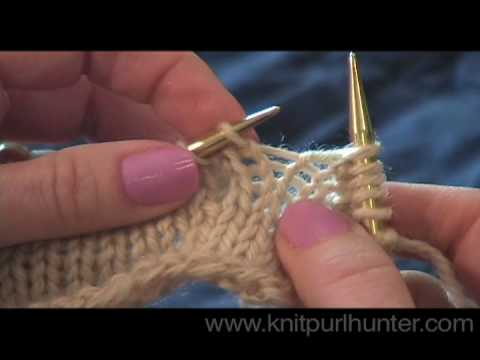
Spread your knitting apart a bit so that you can see the running thread between your right and left needle. See that little piece of yarn there? OK that's the one.


With your left needle push it through that running thread from front to back and bring it up onto your needle.
")
")
Now all you do is knit that stitch through the back loop. It's exactly the same as when you knit it in front so put your yarn over.


Then just finish knitting it and you're done.
The reason you knit it through the back loop is to twist it so you don't make a hole in your knitting.
This is how to make 1 left M1L and M1. Pretty simple right?
Let's keep going...
How to Make 1 Right (M1R) Instructions
")
Once again spread your knitting apart a bit and find the running thread between your right and left needle.
")
")
This time you're going to push your left needle through from the back to the front and bring it up onto your left needle.

 knitting increase")
Then just knit it through the front. It'll be a little tight and awkward but you can do it.

 knitting increase")
And that's how to make1 right, M1R
There's not really much to it is there? It's a pretty basic increase and so simple to do.
Here's a great little knitting video to show you how to make 1 left and right.
How to make 1, M1, M1L and M1R Knitting Video
Pretty easy right? Happy Knitting!
I am a participant in the Amazon Services LLC Associates Program, an affiliate advertising program designed to provide a means for sites to earn fees by advertising and linking to Amazon.com and affiliated sites. If you make a purchase through one of my links I may receive a small commission. This will not affect the purchase price and you will not pay more when you buy through my link.
Copyright © 2011 - 2026 by Vickie Danielsen All Rights Reserved
Please don't copy the content of this site. It is Copyscape protected
